YesLaw
Court Reporter Transcript Tool Help
|
|||
|
The following links will take you to the corresponding location within the help file. |
|||
|
|
|||
Welcome
|
|||
|
Welcome to the YesLaw Court Reporter Transcript Tool. This software enables court reporters to digitally sign their text or ASCII transcripts from their CAT software and create a transcript file that can be read by the YesLaw PDF Transcript Generator software for creating digitally signed PDF transcripts with appropriate branding, word index, and cover page. Digitally signing a transcript makes the transcript tamper-proof – changes cannot be made to the court reporter’s transcript text without raising a warning within the viewing application. |
|||
|
YesLaw Court Reporter Transcript Tool enables the court reporter to: |
|||
|
§ Browse to the text or ASCII formatted transcript file from their CAT software |
|||
|
§ Review witness name, proceeding date, case number and volume |
|||
|
§ Enter shortened case caption |
|||
|
§ Browse to and place a graphical signature |
|||
|
§ Browse to and place a notary graphic (as required) |
|||
|
§ Apply a digital certificate and lock the transcript file for electronic delivery |
|||
|
|
|||
|
Once a digitally signed transcript file is produced by the Court Reporter Tool, the transcript may then be electronically delivered to the requesting court reporting firm where the YesLaw Transcript Generator is used to open the file and produce electronic and paper copies of the transcript complete with customized headers and footers, cover page, hyperlinked word index and hyperlinked exhibits. |
|||
Running the Court Reporter Tool
|
|||
|
Upon installing the Court Reporter Tool, an icon will be placed on your desktop. Double click this icon to run the software or select the Court Reporter Tool application from your All Programs menu item under your Start button menu. The application will appear as shown below. |
|||
|
Begin by clicking the Browse button immediately below where the interface indicates “Please browse to and select your text/ASCII-formatted transcript.” Browse your computer to the text or ASCII formatted transcript file as produced from your CAT software. Alternatively you may drag-and-drop the transcript file onto the application window. The path to the selected file will fill in the white box to the left of the Browse button. |
|||
|
The software will attempt to determine the job number, witness first and last names, proceeding date, case caption, case number and volume from the transcript. The software is fairly good at deducing these values from the text transcript, but please review the values and make corrections as required. You may simply click on any incorrect values and update as necessary. The case caption will almost always be too long for practicable use. Enter an abbreviated case caption. |
|||
|
|
|||
Electronic and Digital Signatures
|
|||
|
First we must begin with a brief explanation of terminology. A wet signature is a signature applied to a document with a pen. An electronic signature is not applied with a pen, but is applied as data within a computer file. An electronic signature can be as simple as typing “/s” and your name within a text email. If you email supports formatted text, a font akin to handwriting can be used to add a signature. Better is to scan a wet signature and create a small, cropped signature graphic file and apply this to the document. Examples of these electronic signatures are provided below. |
|||
Instructions for creating a signature graphic file are included later in this help document. The format of the graphics file should be a 24-bit bitmap or .bmp file. The size is not particularly important; however the graphic should be cropped to not include excess white space around the signature. |
|||
|
Digital signatures are a step beyond electronic signatures in that they lock or tamper-proof the signed file. Digital signatures are issued by certificate authorities such as Verisign, GlobalSign, Thawte and Comodo which provide trust, traceability and revocation for issued digital signature credentials. Instructions for obtaining a digital signature certificate is included later in this document. |
|||
Applying Electronic and Digital Signatures
|
|||
|
To apply an electronic signature graphic, select the Browse button for the graphic signature and browse your computer files to locate and select your signature graphic file. The path to the location of the file will fill in the white box immediately to the left of the Browse button. The first signature location checkbox will auto-select and the software will place the signature on the provided underline of the certificate page at the end of the transcript. Confirm the placement of the signature by clicking the Place button. The transcript view on the right will scroll to the certificate page and indicate the location of the signature. Adjust the location or move the signature location by clicking elsewhere in the transcript. |
|||
|
Should an additional signature be required, check the checkbox for the Optional Second Signature then click the Place button to (re)position the second signature. Most jurisdictions do not require a second signature. |
|||
|
To apply a digital signature, check the checkbox for Apply Digital Signature and then either select to browse you computer for a certificate file or browse the Windows Certificate Store for an installed certificate. Certificates obtained from certificate authorities are typically installed in the Windows Certificate Store on a computer. |
|||
Adding
a Notary
|
|||
|
A notary stamp can be applied electronically to the transcript file. Click the checkbox for Apply Notary as required and then click the Browse button to browse your computer for a graphical notary file of your notary stamp and signature. This graphic file is created similarly to a graphical signature file. Finally click Place then click on the transcript to place the notary stamp graphic appropriately within the transcript. |
|||
Creating a Transcript File
|
|||
|
After reviewing and correcting the transcript information, applying electronic or digital signatures, and optionally applying a notary graphic, save your transcript file by clicking the green Save Transcript… button at the bottom of the application window, entering a transcript file name, and browsing to the location on your computer to save the file. Once the file has been saved, it may be emailed or uploaded to the court reporting firm doing production using the firms preferred transcript communication method. |
|||
Creating Signature Graphic Files
|
|||
|
The following provides instructions on how to create a signature graphic file to be used within the YesLaw PDF Transcript Generator application and Court Reporter Transcript Tool application. The PDF Transcript Generator application will add this signature to created PDF transcripts on the court reporter certification page. This procedure does not assume the use of any special software but utilizes software available on a typical Windows PC. |
|||
Sign
a Page and Scan Your Signature
|
|||
|
To begin, sign anywhere on a blank piece of white paper but not too near the edge. Use a Flair type marker so the line weight is not overly fine. A fine ball point pen will not scan and look as good when inserted into PDF documents. Select a dark pen color. |
|||
|
Then scan the signed page to a PDF-formatted file - this is a typical option for scanned files. For court reporters, you may use the same scanner used for scanning exhibit documents. For a black signature, scan in black-and-white. For a color signature, scan using color. |
|||
Open the Scanned Page in Adobe Acrobat or Reader
|
|||
|
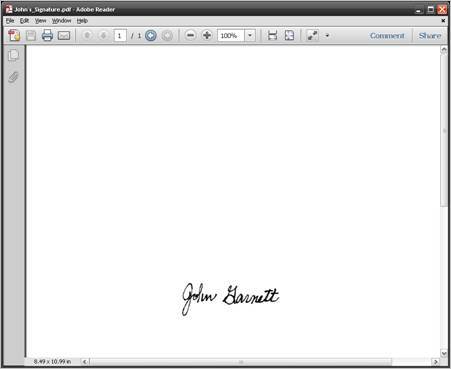
Open the scanned page PDF file with Adobe Acrobat or Adobe Reader. Should you not have either of these applications, Adobe Reader is a free download (http://get.adobe.com/reader/). Download and install the Adobe Reader software and open the scanned page PDF file. An example of a scanned signature opened within Adobe Reader X is shown below. |
|||
|
|
|||
|
The process now will differ only slightly depending upon the Adobe Acrobat or Adobe Reader software (and version) chosen to open the PDF file. Within Adobe Reader X, chose Edit è Take a Snapshot. The cursor will change to cross hairs (+). Drag over the signature making sure to capture the entire signature without excessive white space around the signature. The captured area will be shown in light blue as you drag over the signature. |
|||
|
|
|||
|
When you release the mouse button upon completing your selection, the software may confirm the selected area has been copied with the alert box shown below. If you had previously requested this alert box not be shown, there will be no confirmation. |
|||
|
|
|||
|
Within Adobe Acrobat, select the I-beam selection tool and drag over the signature then select Edit è Copy or use the Ctrl + C keyboard short cut. |
|||
Trim
and Save the Signature in Paint
|
|||
|
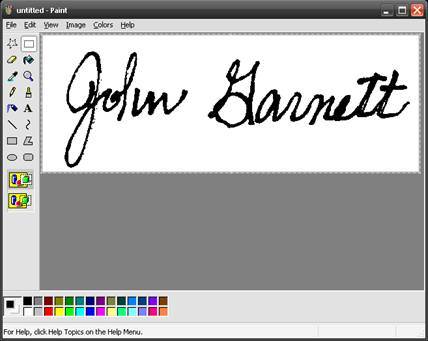
Now open the Paint application. This application is included on all Windows PCs although sometimes the application is not quite so easy to find. For my computer, I find Paint by selecting the Start menu in the lower left screen corner, then selecting All Programs and then selecting the Accessories folder. |
|||
|
An untitled Paint window will open. Paste the previously copied signature into Paint by selecting Edit è Paste or using the Ctrl + V keyboard shortcut. Do not be too concerned that the signature appears larger than you expected. Also do not be too concerned if there seems to be too much white space around the signature. However, if you accidentally cropped some of the signature, return to Adobe Acrobat or Adobe Reader and re-copy the signature. |
|||
|
|
|||
|
In the example, I did not capture excessive white space around the signature, but the space can easily be reduced. Immediately after pasting the signature, click on the signature and drag to the upper left until the white space to the left and above the signature is minimized. See below. |
|||
|
|
|||
|
Then to reduce the white space below and to the right of the signature, mouse-click in the dark grey area outside of the white copied signature area but within the Paint window and then drag the tiny white box in the lower right corner of the signature upwards and to the left until the white space is minimized. |
|||
|
Now save the trimmed signature by selecting File è Save As… and enter the signature name as the file name. Select the Save as Type as a .bmp file type by selecting 24-bit Bitmap (*.bmp, *dib) from the pull-down menu. Save the file temporarily to your desktop. |
|||
Obtaining a Digital Signatures Certificate
|
|||
|
To digitally sign and certify a document, the creator must have a digital signature certificate issued by a certificate authority. Such certificates come in a number of types with the least expensive an email certificate which is available free from Comodo. However the certificate is somewhat difficult to obtain – it requires the user to apply for and retrieve the certificate using Internet Explorer – not the new Edge browser, not Chrome and not Firefox. The Comodo certificate expires in one year, so you will need to remember to renew. (http://www.comodo.com/home/email-security/free-email-certificate.php) Other digital certificates that provide a higher degree of traceability are available but do cost more and are not necessary to sign and certify documents. An email digital certificate is all that is required to digitally sign and certify YesLaw PDF transcripts. |
|||
Obtaining a Digital Certificate and Signature from YesLaw
|
|||
|
As an easier alternative, YesLaw provides a digital certificate for signing your transcripts that costs $25 and is good for ten years. Download the Agreement Form using the link below. Download it first then complete the form, save it and forward it to us by email or fax. Delivery instructions are at the bottom of the form. We will reply by email with your certificate and installation instructions. www.yeslaw.net/downloads/YesLaw_Digital_Certificate_Agreement_Form.pdf And if you sign your name within the empty box at the bottom of the form, we will create and email a graphical signature file for your use within the YesLaw software. |
|||
|
Once one obtains a digital certificate, the certificate is typically installed in a Windows PC within the “Windows Certificate Store.” From there, the certificate can (and should) be exported to a file for copying from computer to computer and most importantly to create a backup of the certificate to be stored on a CD or USB thumb drive for secure, safe keeping and restoring should the computer “crash” or be stolen. |
|||
|
|


 Once you have obtained your
digital signature certificate from Comodo or other provider, export the
certificate to a file and copy the file to either a CD or USB thumb drive and
save in a secure location in case you need to recover or restore your
certificate.
Once you have obtained your
digital signature certificate from Comodo or other provider, export the
certificate to a file and copy the file to either a CD or USB thumb drive and
save in a secure location in case you need to recover or restore your
certificate.